Preface: I wrote this series of articles to show how to get excellent results in body work with simple tools. It's intended to be a guide for the novice body worker trying to save money, and covers only surface preparation prior to painting. Not everybody can afford the big air compressor and special tools associated with this kind of work for what may be a one time job. I'm into my third full restoration and sixth paint job, and still prefer to keep it simple. I hope this little piece will help someone because any day I can help someone is a good day for both of us. Click here to see all articles in this series
- John D. Weimer
Rough Sanding
The purpose of rough sanding is to remove some of the original finish down to where it can provide a solid substrate for primer to adhere to. Deep rock pecks and chips are to be sanded down to bare metal. More about sanders and primer for bare metal later.
The door in this picture has been rough sanded and primed with DuPont #131S "Fill N Sand" acrylic primer surfacer. Professionals hardly ever use this any more, it is now considered archaic; but, it's economical, effective, safe & easy to spray, works well for me, and I prefer it.
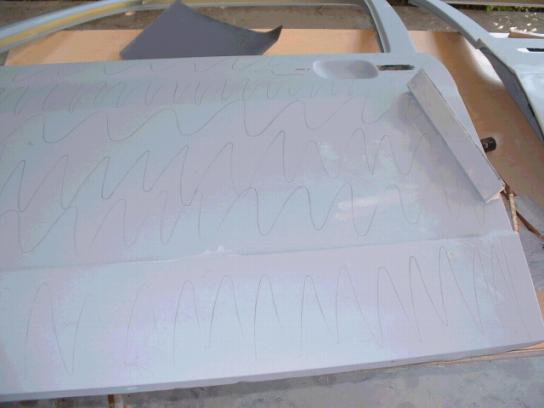
In the first picture, the door has been marked with a pencil to help locate low areas while sanding. Aerosol paint a different color than the primer could be lightly spritzed on as a guide coat, but at this stage lead pencil marks work just as well and are quicker (& cheaper).
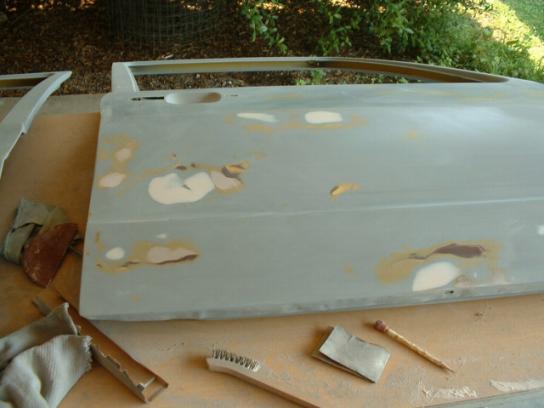
The sandpaper you see on the right edge of the door is 180 grit dry production paper wrapped tightly on a ten inch piece of paint stick. Sanding lightly, using long multi-directional strokes, will point out high spots as well as low ones.
This door had never been damaged and worked out very easily. By using a long stick with long multi-directional strokes a high area was found by the time all the pencil marks were sanded out. The yellow and brown area was only about as thick as a good layer of paint & was higher than it should have been. That's plenty enough to show a wave in a finished paint job. The two small silver areas are where I went to bare metal to know exactly where I was in this process. When I saw metal, the discolored area was blended to the primer, and all pencil marks were gone. Then, I knew it was perfectly flat.
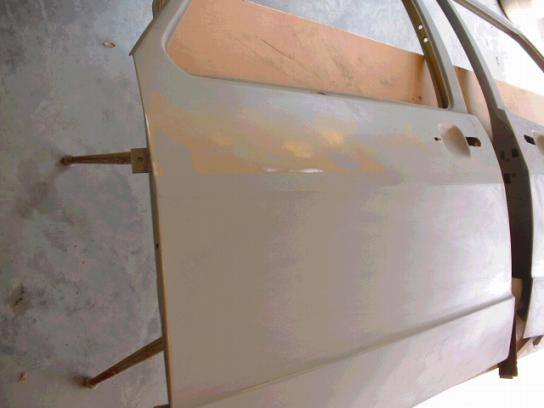
The right side of the vehicle had taken a moderate hit in this door, the door jam, and an area of about 18" behind the door. The repairs had been quick and sloppy with lots of "Bondo". So, the job began with removing excess body filler while the door was still installed so it and the area behind could be contoured and fitted at the same time. About 10" of door jam had to be re-fitted to the door with fiberglass reinforced body filler. Reworking a botched job is harder than doing it from scratch.
Stick sanding revealed a couple of low areas and a high spots. The ones that are circled, (showing bare metal), were sharp little peaks. There's only one way to remedy that: I tapped them down with a small hammer and proceeded to the next step.
Close inspection of the smoothly sanded door revealed 10 flaws which were circled with the lead pencil as they were found. The 5 spots near the edge were no more than pin holes, but they look like gopher holes in a finished paint job; and, usually, no amount of primer will completely fill them. Always apply filler to an area somewhat larger and thicker than what the flaw seems to be so it will "feather in" completely with the first sanding.
Applying and Sanding Filler
The filler used here is Dynatron #592 "Putty-Cote" and is the best finishing putty I have ever found. It is very soft and "skimable", leaves no air bubbles, no tackiness on top, sands and featheredges like a dream. It can be applied to bare metal, sanded paint, or scuffed primer with equally good results.
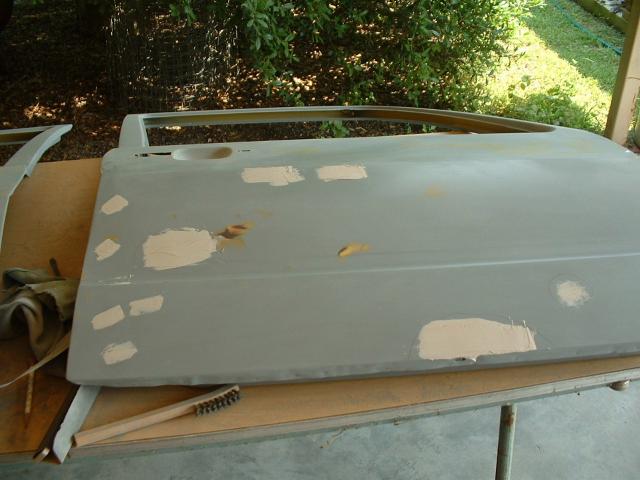
Door Filler Finishing Putty
JDW's NOTE: When mixing body filler I never use more than half the recommended hardener; the same goes with fiberglass resin. It doesn't matter how little or how much hardener you use, the putty will cure to the same firmness and consistency when thoroughly mixed. Using only a little hardener gives you more time to work and conserves material that would otherwise begin curing before you're finished with it.
As the filler cures it goes through a heating period and is ready to sand when cool to the touch with the backs of your fingers. I mix filler on discarded snap-on coffee can and plastic ice cream container lids. They get trashed anyway and sometimes you can bend them and, the cured filer pops off so you can reuse them. Besides, they have two useful sides.
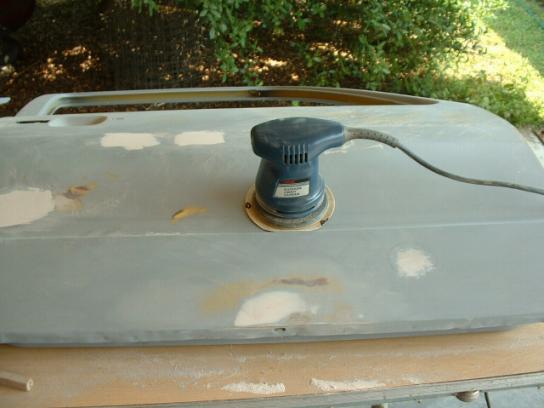
The little Ryobi 5" random orbit sander is the best thing I've ever bought for body work; handy as a pocket on a shirt. I work filler, rough sand paint, and even remove paint to bare metal in small areas with it. I've used this one for 8 years and the best discs I've found are at Sears. They are yellow on the abrasive side, cloth-like on the back, and tougher than a cheap steak. The only ones you need in body work are 60-grit so save your money and don't buy the variety pack of discs.
By the way: The little wire brush is for cleaning out the 180-paper. It fills real fast, but will last 10 times longer if you clean it every little bit.
Don't attempt to power sand to a finish. Just take the top down flat and leave an edge around it about the thickness of a match book. With the meager equipment we have and the skills we possess power is for roughing and elbow grease is for finesse. Try powering to a finish and you'll usually end up having to repair what you screwed up.
You can get a little better look at the stick sander in the below photo. The 180-grit sandpaper is wrapped tightly around the stick and as you use up a section you tear it off and begin working with the newly exposed paper. You can even sand with the edge of the stick which works real good along the insides of breaks like run the length of these doors. The little wire brush is for cleaning out the 180-paper which fills with residue real fast. Cleaning it every little bit makes it last 10 times longer.
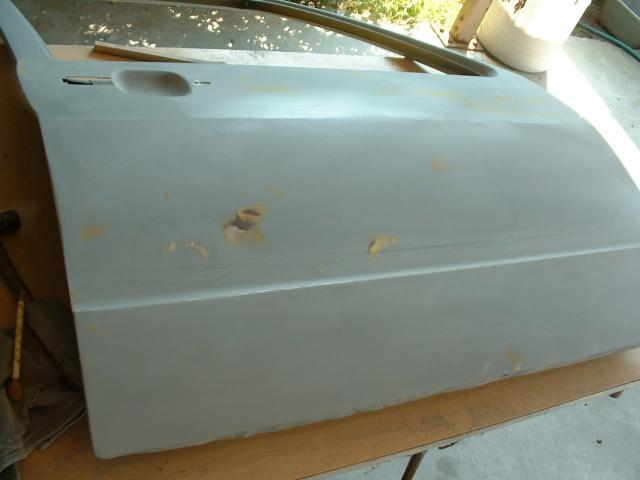
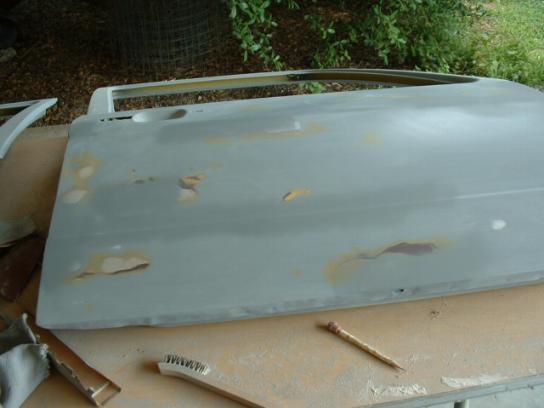
You'll notice in this picture that the stick picked off more high places than seen in photo #3. That's because when I picked out the low places I stopped sanding and filled them before going further; it just saves work. Notice how the newly applied filler and discolored areas all feather into their surrounding areas. Now is the time to "feel it out". If the door and/or your hand is dusty so your hand slides over the surface as if lubricated you're ready to go. If you feel any resistance as you rub your hand over the surface put a thin rag, like old bed sheet or t-shirt material, under your hand. Now, slowly run your hand over the entire surface in all directions. You can feel flaws you can't see at this stage, so feel 'er up good. If you think you feel something, take a damp cloth, run it over the suspected area and get down at a shallow angle for a good look. If you see something, circle it with the pencil, cross hatch the area with pencil marks, and go at it with the stick sander 'til it lines out or you have to skim in some filler. NEVER try to sand out a low area. If you can work a high area surrounding it down to it's level that's great, otherwise skim some filler in and go at it again.
In the picture the white spots are the Dynatron we put in, pink is filler from the original botched repair, red/brown is primer from that repair, yellow is original paint, and mustard is Vari-Prime self etching primer immediately under the gray primer. When you can't feel any flaws, especially in these areas, you're finished with this step.
Applying and Sanding Primer
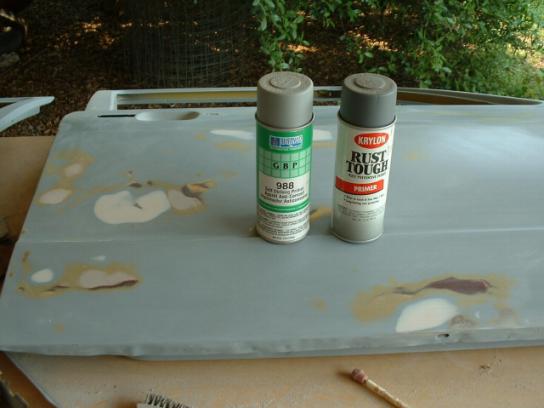
Aerosol primers are OK for doing small areas and avoiding the mess of mixing for, shooting with, and cleaning up a spray gun. The Sherwin Williams GBP # 988 is the best self etching aerosol primer for bare metal I have ever found. Spray it in a well ventilated area and avoid breathing the fumes. It smells just like DuPont Vari-Prime which is referred to by many professional painters as "Yellow Death". It's hot stuff, so shoot a little, step back, watch which way the overspray drifts, and stay clear of it. You may well ask, "If you know so much about how these so called lethal materials smell; why ain't you dead?" Well, I don't know. Maybe the cigars and cigarettes I smoke protect me from it. Just don't take a chance with your health and stay out of the fumes.
There is still a tiny high spot right in the middle of the Dynatron beside the cans. It's no thicker than one coat of paint and, although you can't see in the photo, feathered nicely. About 4 coats of primer filler on that area along with careful sanding and it will never show.
The darker gray areas are where I covered bare metal with the self etching primer. Use it sparingly, only enough to get coverage on the bare metal areas; using any more is a waste of it and it ain't cheap. These doors are now ready for, (actually in), final primer.
I used the same primer filler as in step one, but you can use non-sanding primer at this stage if you want. I prefer the added insurance of that little extra thickness of primer to work to even at the expense of it being more labor intensive. It's best to spritz on a very thin showing, (not even a coat), of black aerosol paint then block and/or hand sand with 400-grit paper. This is performed as a wet sanding and is done with a deft touch. Great care is taken to "pet and coax" the surface to well sanded perfection with no flaws or sand-through. If you find a flaw or sand through, re-prime and pet it into shape.
Color Coat Painting
Color coat painting; that's a whole 'nother story that I'll not get into because I learn every time I do it. That step is something you can do or you can't, there's no in between, and if you think you can't, take it to a pro.










talking with a mechanic about this today...
need ideas
regular practice to make it perfect biro
jodoh
Want to leave a comment or ask the owner a question?
Sign in or register a new account — it's free